"Anyone backing up their phone to their MAC, instead of the cloud? How well does it work? I have an iPhone and I prefer not to dump all of my photos and video into the iCloud, and instead like to keep my stuff more private and back up myself. Anyone here doing this seamlessly with their Mac Desktop/Laptop?"
If you don't want to back up your iPhone data to the cloud as well, you can complete the backup task with your Mac. In this guide, we've shared 4 effective ways about how to back up iPhone to Mac. Then you can keep your backup file offline.
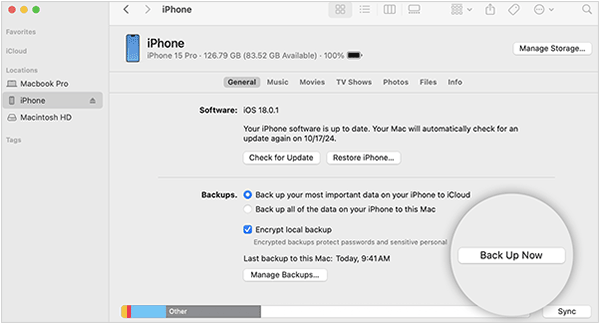
For macOS Catalina and later, Finder is the primary tool for managing and backing up your iPhone. It has replaced iTunes for these functions. You can back up almost all your iPhone data to your MacBook with Finder at once.
Step 1: Use a USB cable to connect your iPhone to your Mac. Click on the "Finder" icon in your "Dock".
Step 2: In the Finder sidebar, under "Locations", click on your iPhone's name. If it's your first time connecting, you might be asked to "Trust This Computer" on your iPhone and enter your passcode.
Step 3: In the Finder window, under the "General" tab, you'll see a section for backups. Select "Back up all of the data on your iPhone to this Mac". For an encrypted backup (recommended for sensitive data like passwords and Health data), check "Encrypt local backup" and set a password.
Step 4: Click "Back Up Now" to begin the process. You can monitor the progress bar at the bottom of the Finder window.
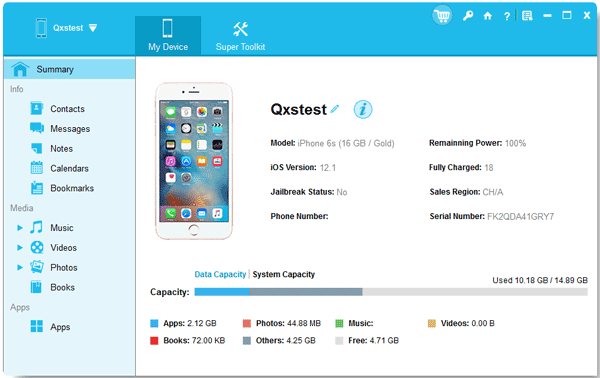
Another one-click backup way is to use iPhone Data Manager, a dedicated data transfer tool, supporting backing up, restoring, and managing data for most iOS devices. It enables you to back up your iPhone data to your Mac or Windows PC in 1 click. Furthermore, it allows you to select the files you want, and then transfer them to your computer.
- Back up iPhone to a MacBook with simple clicks.
- Help you back up your messages, contacts, call history, notes, Safari, calendar, photos, etc.
- Back up iPhone data to Windows PC as well.
- Restore data from backup to an iOS device.
- Enable you to selectively transfer iPhone videos, pictures, music, and more to your computer.
- Compatible with iOS 5.0 and upper, including iOS 26.
- Support Mac OS X 10.9 or later.
Download iPhone Data Manager below.


Step 1: Please install the iPhone Data Manager on your Mac, and then open it.
Step 2: Connect your iPhone to the Mac device with USB, and click "Trust" on your iPhone if prompted. Then the connection will be established.
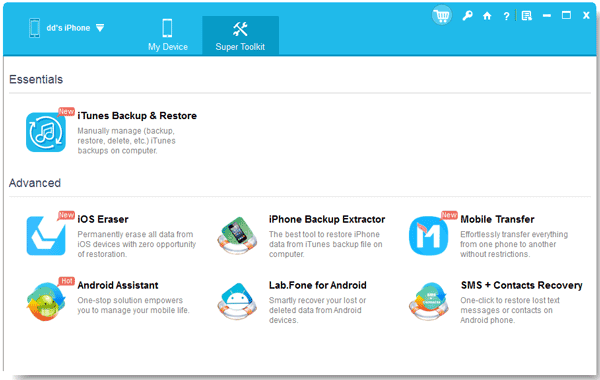
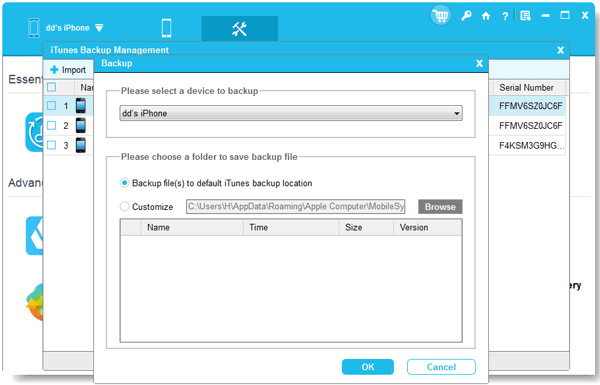
Step 3: To back up your iPhone data in one go, click "Super Toolkit" > "iTunes Backup & Restore". Then choose your iPhone device, and click the "Backup" icon on the menu.
Step 4: You can select a location on your Mac by choosing "Customize" > "Browse". Finally, click "OK" to start backing up your iPhone data to your MacBook.
iCloud provides a convenient way to back up your iPhone wirelessly to Apple's cloud storage. You can use iCloud to download your iPhone data to your MacBook for backup. Furthermore, if your iPhone data back up to iCloud, you can access your backups from anywhere or don't always have your Mac handy.
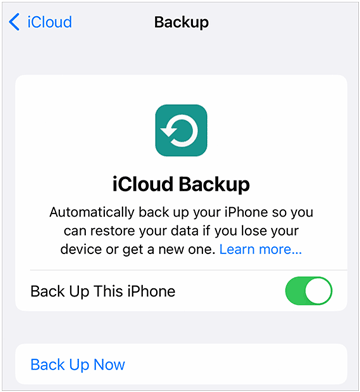
Step 1: Ensure your iPhone is connected to a stable Wi-Fi network. On your iPhone, open the Settings app.
Step 2: Tap on your name at the very top of the Settings screen. Tap "iCloud" and scroll down and tap "iCloud Backup". Turn on the toggle for "Back Up This iPhone". Then your iPhone data will be backed up to your iCloud account.
Step 3: On your Mac, please click "Apple Menu" > "System Settings", and tap your name. Make sure you have signed in.
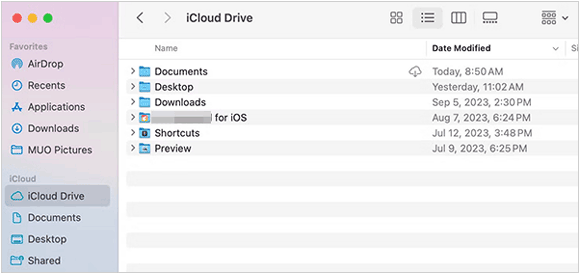
Step 4: Click "iCloud" > "Manage" > "Backups" to check your iPhone backup data. However, you cannot directly download the whole backup file on your Mac. You can only save your photos from iCloud Photos, and some files from iCloud Drive.
If your Mac is running macOS Mojave (10.14) or an earlier version, iTunes is the application you'll use for iPhone backups. It's similar to using Finder, which can back up all your iPhone data at once.
Step 1: Use a USB cable to connect your iPhone to your Mac. Next, launch iTunes on your Mac.
Step 2: In the iTunes window, click on the device icon (which looks like a small iPhone) near the top left corner, next to the "Music" dropdown.
Step 3: Under the "Summary" tab, in the "Backups" section, select "This Computer". For enhanced security, check "Encrypt local backup" and set a password.
Step 4: Click "Back Up Now" to begin the backup process. You can see the progress at the top of the iTunes window.

Q1: Can I back up my iPhone to Mac via Google Drive?
No, you cannot directly back up your entire iPhone to your Mac via Google Drive in the same way you would with Finder. iPhone backups are highly structured and are managed by Apple's own system (Finder on macOS Catalina or later, iTunes on older macOS, or iCloud). However, you can upload specific files from your iPhone to Google Drive, and then access Google Drive to download the files on your MacBook for backup.
Q2: Where are iPhone backups stored on Mac?
In general, your iPhone backups are stored in this path: ~/Library/Application Support/MobileSync/Backup/. If you want to access your backup, you can press Cmd + Shift + G, paste the path, and hit Enter. If you use iPhone Data Manager in Part 2, you can select a location you want to save your iPhone data.
Q3: Can I view what's inside an iPhone backup?
It depends. If you back up your iPhone with Finder, iCloud or iTunes, you cannot view or access the backup file. But if you back up your iPhone data with iPhone Data Manager, you can directly view your backup files on your MacBook. This tool can back up your data with readable file formats, and it doesn't change the media files' format.
So, the 4 methods mentioned above can help you back up your iPhone to Mac. If you want to access your iPhone backup data on your Mac with ease, you can choose iPhone Data Manager, it can back up your iPhone data with accessible file formats, such as saving contacts as XML or VCF. Moreover, you can conveniently restore your backup when you need it.
Related Articles
How to Transfer Photos from Mac to Samsung (Full Guide in 2025)
How to Send High Resolution Photos from iPhone to iPhone and Android Phone
Smoothly Transfer Music from iPhone to Computer (Quality Guide)
Sync Apps from iPhone to iPad in 3 Practical Ways [Proven]

Charlotte Smith, an accomplished editor in the dynamic landscape of mobile technology, has distinguished herself with her abundant experience and skills for iPhone, OnePlus, Sony, Vivo, Motorola, ZTE, Huawei, etc. Help readers and users solve the problems in iPhone Transfer and Mobile Data Management. Her proficiency extends beyond mere functionality, delving into the nuances of each brand with precision and clarity.
Copyright © samsung-messages-backup.com All Rights Reserved.


