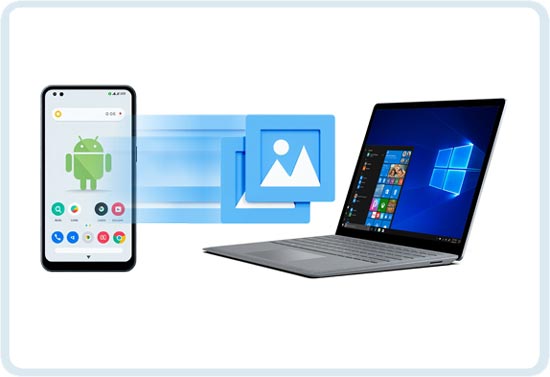
Currently, it's effortless to transfer photos from Android to a laptop if you know the right methods. In this guide, we will provide you with 6 different and reliable solutions, ranging from one-click tool to cloud-based methods, to help you transfer your pictures with ease.
The simplest way to transfer photos from your Android phone to your laptop is by using a one-click transfer tool like Samsung Messages Backup. This tool makes the entire process seamless, enabling you to view all your Android photos on the desktop and select the pictures you want. Furthermore, it won't change your photo's quality or formats.
- Seamlessly transfer your photos from Android to a laptop.
- Support photo previewing, moving, copying, deleting, and more on your PC.
- Allow you to create photo albums to organize your Android photos on the desktop.
- Directly import pictures from your laptop to Android.
- Transfer videos, contacts, text messages, call logs, and more from Android to a computer.
- USB and Wi-Fi connections are available.
- Support Android 6.0 and above, including Android 15.
Download the photo transfer software.


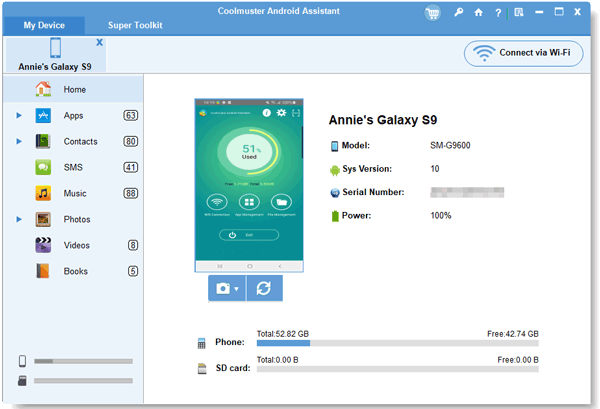
Step 1: Install the software on your laptop, and run it on the desktop.
Step 2: Connect your Android phone to the laptop with USB, and enable the USB debugging mode on your Android device. Then you will see the connected interface.
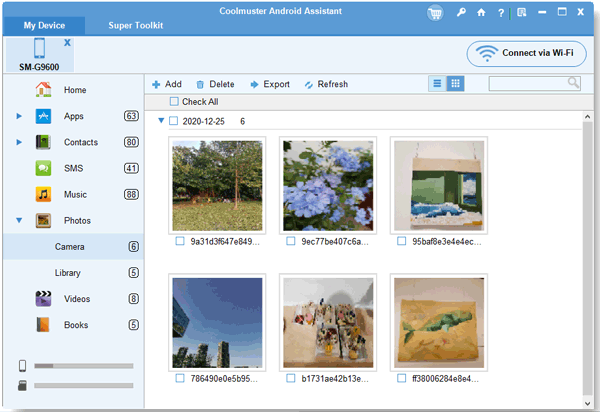
Step 3: Choose the "Photos" option, and select the images you want to transfer. Then click "Export" to copy the photos from the Android device to the laptop.
Tips: You can also wirelessly transfer your photos. In this case, please ensure your Android and laptop devices are both connected to the same network.
Google Photos provides a cloud-based solution for transferring and storing your photos. By syncing your photos with your Google account, you can access them from any device.
Step 1: Install and open Google Photos on your Android phone, and then log in to your Google Account.
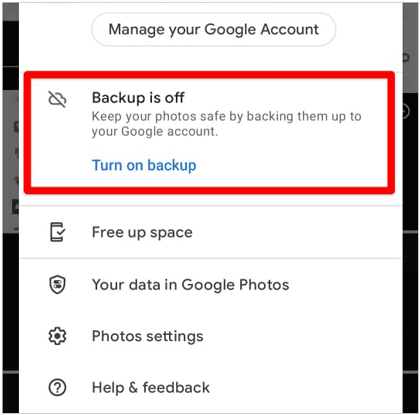
Step 2: Click the "Menu" icon, and turn on the backup feature. Please ensure your network is stable during the process.
Step 3: On your laptop, open a browser, and go to the Google Photos website. Then sign in with the same account.
Step 4: Select the photos you want to download, and save them on your laptop.
Using Quick Share is a convenient way to share and transfer photos and other files between Android and Windows devices. However, if you are using a MacBook, Quick Share cannot work well for macOS.
Step 1: Please enable Bluetooth on both devices, and make sure your Android device is visible to others.
Step 2: Download and install the Quick Share app on your laptop. Then sign in with the Google Account you used on your Android device.
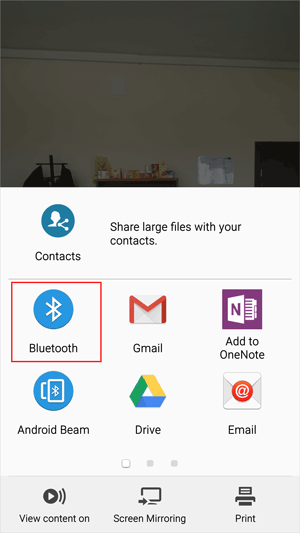
Step 3: Navigate to the Gallery app on the mobile phone, and select the photos you want to transfer. Then click "Share" and choose "Quick Share".
Step 4: Select the device that is your Windows laptop from the list of available devices. Next, accept the transfer on your laptop. Then the photos will be saved to your laptop's default download folder.

There is no doubt that every Android phone and most laptops support Bluetooth, but do you know how to move pictures from Android to a laptop via Bluetooth? Luckily, the steps are simple. However, it will be time-consuming to send lots of photos with Bluetooth:
Step 1: Please turn on the Bluetooth both on your laptop and Android device. On a laptop, click "Control Panel" and "Settings", then find "Devices" in it, and you can see Bluetooth here. On an Android device, you can find Bluetooth in Settings without any difficulty.
Step 2: On your laptop, select "Add a device" and then the Bluetooth on the laptop will search for your Android device. You will see your Android Bluetooth on this list. Next, double click the phone icon on your laptop, it will give you a code for matching. Choose "Yes" on the laptop.
Step 3: When your devices are connected, please open your Photos on your Android phone, select the pictures you hope to transfer. And then, tap on the "Send" option and select the Bluetooth icon, which means sending the pictures via Bluetooth.
Step 4: On the laptop, you need to choose a destination like a desktop or a folder to save the sending pictures. Finally, click the "Finish" button. Wait for several minutes to complete.
The Microsoft Photos app, in conjunction with a USB cable, offers a convenient way to transfer photos from your Android phone to your Windows laptop without any network or cloud services.
Step 1: Connect your Android phone to your laptop with a USB cable, and choose "File transfer/Android Auto".
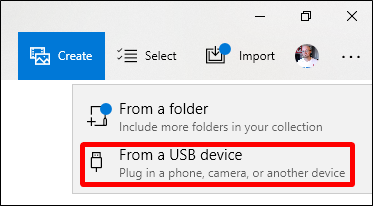
Step 2: Click "Start" and find the "Photos" app on the laptop. Then tap "Import" and choose your connected device.
Step 3: Select your photos and import them to your laptop.
Using OneDrive to upload photos from your Android phone to your laptop is a very effective method, especially if you're already integrated into the Microsoft ecosystem.
Step 1: Download OneDrive on your Android phone, and then sign up for an account. If you already have one, please log in to your OneDrive account.
Step 2: Launch the OneDrive app, go to "Settings", and enable "Camera upload". Then your pictures will be backed up to the OneDrive account automatically. Or you can upload photos manually by tapping on the "+" icon and selecting "Upload".
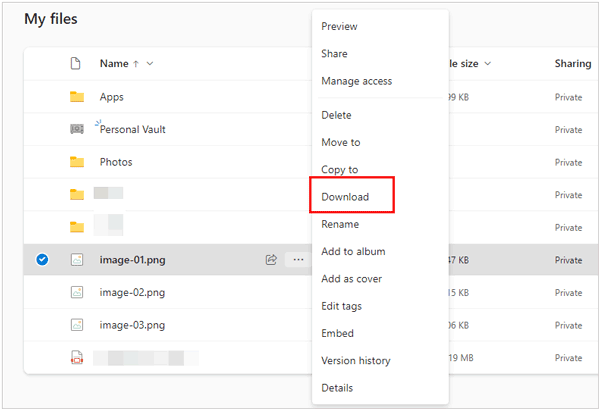
Step 3: Go to OneDrive on your laptop, and sign in with the account. Then you can save the pictures to your laptop directly.
Q1: Why doesn't my laptop recognize my Android phone via USB?
This issue could be caused by several factors, including outdated drivers, incorrect USB settings, or faulty cables. Ensure that you're using the correct USB cable (preferably the one that came with your phone) and that your phone's USB settings are set to File Transfer or MTP mode.
Q2: Can I transfer photos from Android to a laptop without the Internet?
Yes, methods like using Samsung Messages Backup, Bluetooth, or Quick Share allow you to transfer photos without needing an internet connection.
Q3: Is there a way to transfer all photos at once?
Yes, many of the methods above, such as using Samsung Messages Backup or the Microsoft Photos app, allow you to transfer all photos at once. If you're using Google Photos or OneDrive, you can select all your images and download or sync them in bulk.
See? These methods can help you transfer photos from Android to a laptop efficiently, especially when you use the photo transfer software - Samsung Messages Backup. It provides USB and Wi-Fi transfer ways, and enables you to copy all photos at one go.
Related Articles
Send High Resolution Photos from iPhone to iPhone and Android Phone
Google Drive vs. Google Photos: Difference Between Photos and Drive
How to Save Photos from WhatsApp in 4 Functional Ways - Preserving Memories
Move Photos/Pictures to SD Card on Android in 4 Simple Ways
Wirelessly Share Moments: Bluetooth Photos from iPhone to Android
Effectively Transfer Photos from Android to Mac [6 Fabulous Methods]

Sophie Green, Chief Editor of Samsung-messages-backup website, has been focusing on the realm of Android Recovery, Android Transfer (Backup), Android Device Tips, Phone Clean, and Phone Transfer technologies. Recognized contributions on leading platforms attest to her esteemed expertise and reliability.
Copyright © samsung-messages-backup.com All Rights Reserved.


