Equipped with the leading-edge performance, sophisticated world-class design and innovative technology, ASUS has become more and more popular among people. If you are an ASUS user who wants to back up and restore ASUS out of various reasons but does not know how to do it, you are in the right place. This article will instruct you on how to perform ASUS backup and restore in 3 simple ways. Just check the following step-by-step guide to learn how to back up and restore ASUS.
This ASUS backup and restore tool - Samsung Backup and Restore, is the highly recommended ASUS backup app, since it can back up everything from ASUS to computer and restore previous backups from computer to any Android device in one click. Besides, it can also fast transfer contacts, call logs, SMS, photos, videos, music, documents, apps and other files between Android phone and Android phone on computer. Well, the connection between your device and this program is very easy. There are two ways available: USB or Wi-Fi connection, so, you can select either way according to your preference.
Furthermore, the reason why ASUS Backup and Restore is superior to other similar ASUS backup apps lies in that ASUS Backup and Restore is widely compatible with all Android phones and tablets running Android 4.0 and later versions, including Samsung, Sony, Motorola, Huawei, HTC, LG, Google, ASUS, Lenovo, etc. For ASUS phones, it supports all types, such as Asus Zenfone 9/8 Flip/8/7/6/5, Asus Rog Phone 7 Ultimate/7/6D Ultimate/6D/6 Pro/5s Pro/5s/5 Pro/5, etc.


Well, we will take ASUS Zenfone 5 as an example to see how to back up ASUS Zenfone 5 on PC.
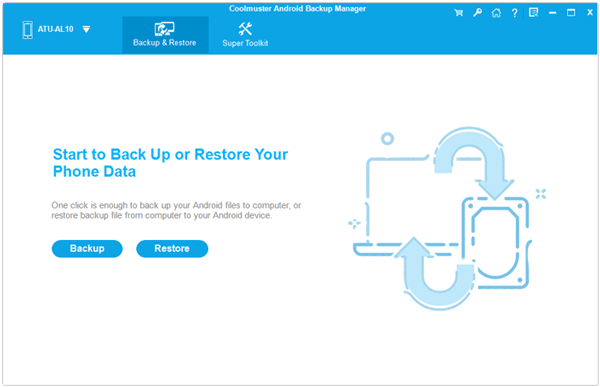
1. Install and launch ASUS Backup and Restore on your computer and enter in Android Backup & Restore module from the toolbox.
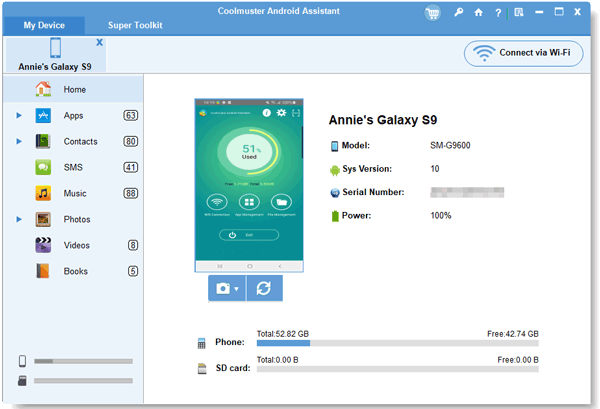
2. Plug ASUS Zenfone into computer via a USB cable, then enable USB debugging on your phone as prompted. After the computer recognizes your phone, you will see the main interface as below.
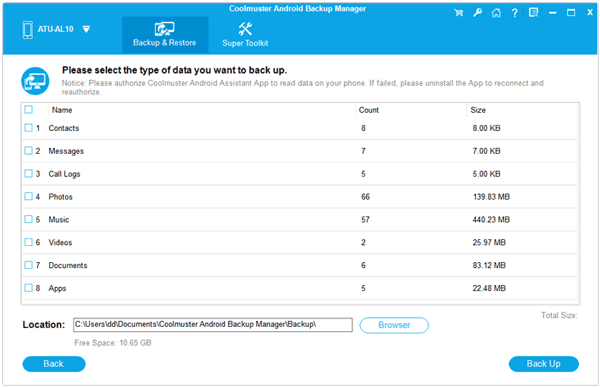
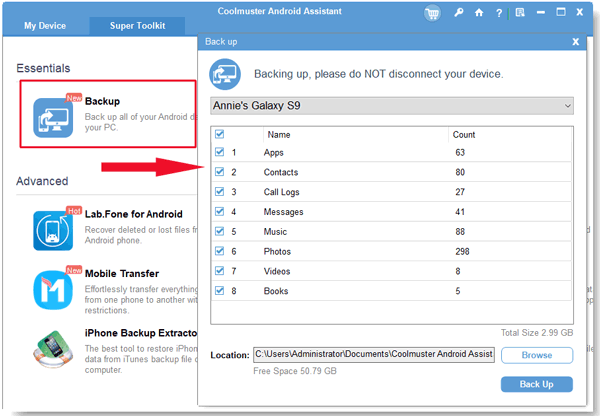
3. ASUS Zenfone backup. Click Backup button from the main interface, check the file type you want to back up from the table, find a location on your computer to store data and tap Back Up button below.
After you back up ASUS using this app, you can follow the steps below to restore ASUS backup to your new device.
1. Use the same way to connect your ASUS to computer.
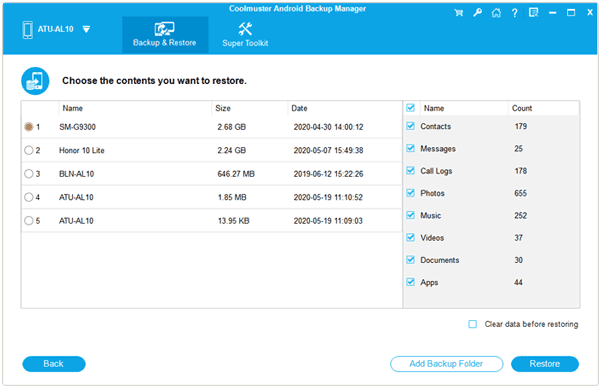
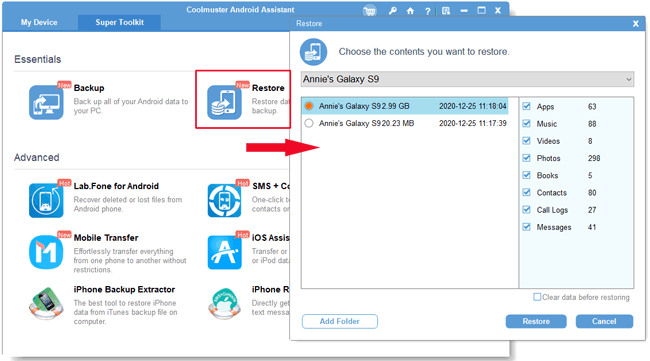
2. Restore ASUS Zenfone Backup. Select Restore button from the main interface, check the target phone from the list, tick the file type you want to restore from the table and click Restore button below.
ASUS Assistant - Samsung Messages Backup, is another recommended ASUS backup app. With it, you can back up and restore overall Android phone data on computer in one click. In addition, the biggest difference between ASUS Assistant and the above ASUS backup app is that ASUS allows you to selectively import and export phone content between ASUS and computer. That is to say, you can selectively back up the desired data instead of the whole folder to computer. What's more, it also supports to transfer messages, contacts, call logs, music, videos, photos, documents, etc. between computer and your phone.
Moreover, if you need to manage Android data in batches on computer, it can also fulfill your demand. You can add, delete, group and edit contacts, send, reply, forward, delete and copy text messages, install and uninstall apps, delete call logs, export contacts to Outlook and import contacts from Outlook.
Well, ASUS Assistant works well with all Android phones as well, like Samsung, LG, Sony, HTC, Huawei, Google, ZTE, ASUS, etc.
1. Install and launch ASUS Assistant on your computer and enter in Android Assistant module from the toolbox.
2. Plug ASUS phone into computer via a USB cable. After a successful connection, you will see the main interface as below.
3. ASUS backup. Click Super Toolkit on the top menu > Backup > Select your ASUS from the drop-down list > Check the files you want to back up > Tap Browse to select a backup location on your computer > Hit Back Up below.
You can restore ASUS backup after you made a backup of ASUS using this app. Let's have a brief look at how to restore ASUS backup.
1. Use the same way to connect your new Android phone to computer.
2. Restore ASUS backup. Click Super Toolkit on the top menu > Restore > Select the target phone from the drop-down menu > Tick files you want to restore > Tap Restore below.
Notes: If you want to back up and restore ASUS data selectively, you can refer to the method in this article: How to back up and restore Android device on the computer.
Apart from the above methods, the traditional way to perform ASUS backup and restore is directly copying and pasting ASUS files on computer. However, this way can only transfer photos, videos, music and documents between phone and computer. Let's see how to back up and restore ASUS directly.
1. Plug ASUS phone into computer via a USB cable.
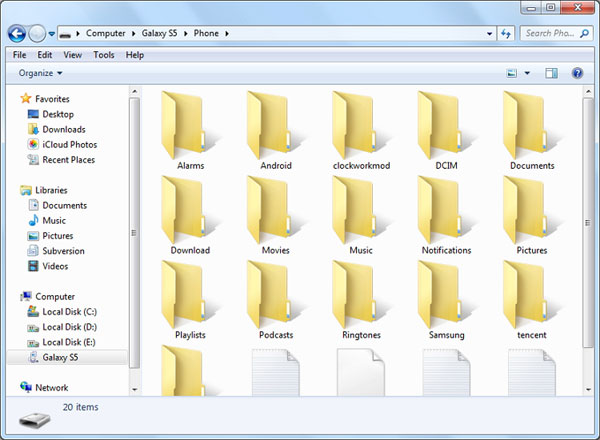
2. Pull down the drop-down screen on your phone, tap the Notification bar promptly and select Transfer files (MTP) in the window Use USB for.
3. After successful connection, go to My Computer/This PC on your computer > Double-click ASUS > Internal Storage (or External storage) > DCIM > Copy the photos you want to back up and paste to a folder on computer.
After you back up ASUS to computer, you can restore ASUS backup to your new device by following the steps below.
1. Connect your new device to computer.
2. Go to My Computer/This PC on your computer > Double-click the target device name > Find a folder in internal or external storage to store data > Copy and paste ASUS backup from computer to the new device.
In this article, we introduce the top 3 ways about ASUS backup and restore. If you know nothing about how to back up and restore ASUS, you can follow the detailed steps introduced above. Personally, I strongly recommend you to try this ASUS backup manager - Samsung Backup and Restore, which is easy to use, totally secure and fast. And if you encounter any problem during use, feel free to leave a comment below.
Related Articles:
One-stop Solution to Backup & Restore Samsung Phones
Call Log Backup and Restore with 4 Advanced Methods [Full Guide]
How to Back Up and Restore Contacts on Android Phone/Tablet [4 Methods]
LG Backup & Restore - How to Back Up & Restore My LG Device in 2023?
ZTE Backup and Restore: 3 Fast Backup and Restore Ways You Can Choose
Huawei Backup -- 4 Powerful Methods to Backup Your Huawei Data

Sophie Green, Chief Editor of Samsung-messages-backup website, has been focusing on the realm of Android Recovery, Android Transfer (Backup), Android Device Tips, Phone Clean, and Phone Transfer technologies. Recognized contributions on leading platforms attest to her esteemed expertise and reliability.
Copyright © samsung-messages-backup.com All Rights Reserved.


