If you want to keep your iPhone and Mac in sync for efficient data management or data backup, you will need a secure way to sync iPhone to Mac. If you are new to data synchronization between these Apple devices, don't worry, because we have provided you with 5 approaches. You can choose one to complete data synchronization.
Since macOS Catalina, Finder has replaced iTunes as the primary tool for managing iOS devices on a Mac. You can sync your iPhone to your Mac either using a USB cable or wirelessly.
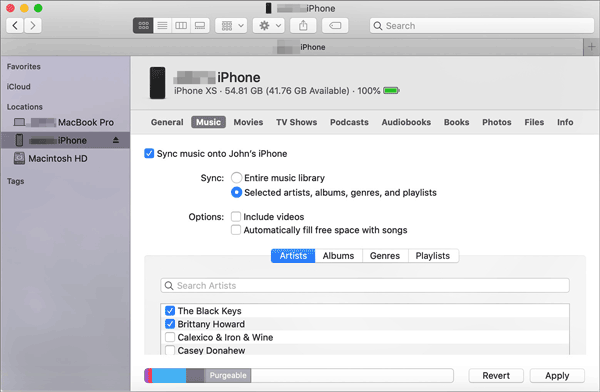
Step 1: Connect your iPhone to your Mac using a Lightning or USB-C cable.
Step 2: Open Finder and select your iPhone from the sidebar under "Locations". Click "Trust" on both devices if prompted.
Step 3: Navigate through the tabs (Music, Movies, Files) and check the boxes for the items you want to sync. Click "Apply" or "Sync" in the bottom right corner.
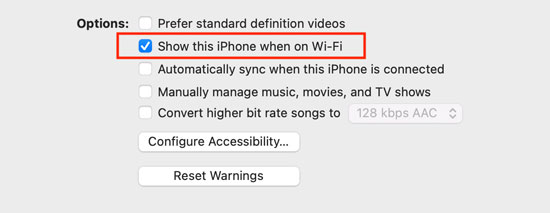
Step 1: Once you have connected via USB, you can enable Wi-Fi syncing so you don't need the cable next time. In the "General" tab of the Finder window, check the box: "Show this iPhone when on Wi-Fi".
Step 2: Click "Apply". Now, as long as both devices are on the same network, your iPhone will appear in Finder automatically.
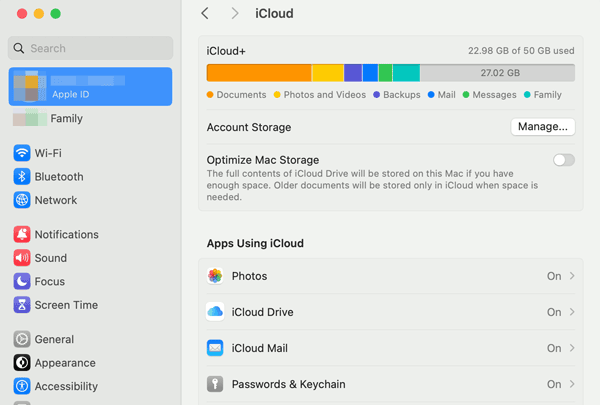
If you want to sync an iPhone with a MacBook wirelessly, iCloud will be the most seamless method because it works in the background without requiring manual "sync" sessions. You can also use it to sync your data between your iPhone and iPad.
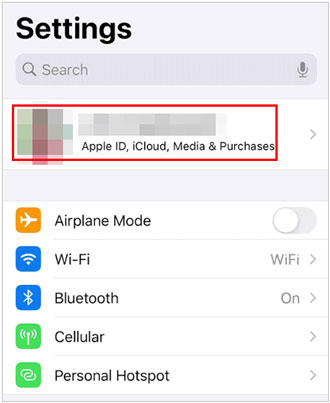
Step 1: Go to Settings on your iPhone, and click "[Your Name]" > "iCloud". Toggle on the apps you want to sync (Photos, Notes, Contacts, etc.).
Step 2: On your MacBook, go to "Apple Menu" > "System Settings" or "System Preferences" > "[Your Name]" > "iCloud".
Step 3: Ensure you are signed into the same Apple ID on both devices. Turn on the same categories you enabled on your iPhone. Data will now merge and update across both devices instantly via the cloud.
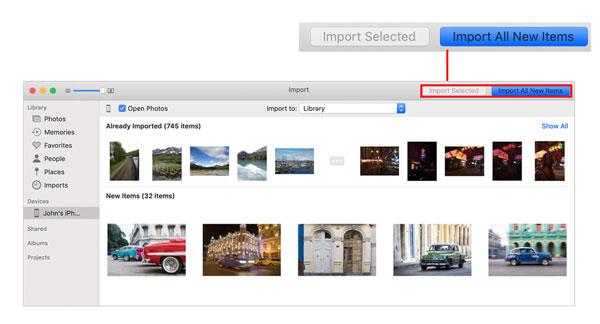
If you only want to sync your media library to your Mac to save space or edit on a larger screen, the Photos app is the best tool. In this way, you can import your videos and photos from your iPhone to Mac.
Step 1: Connect your iPhone to your Mac via USB, and open the Photos app on your Mac.
Step 2: Click on your iPhone's name in the sidebar under "Devices". Then select the photos and videos you want to transfer, or click "Import Selected" in the top right corner.
Step 3: You can also check the box "Delete items after import" if you want to clear space on your iPhone automatically. Once done, the media files will appear on your Mac.
iPhone Data Manager is a comprehensive desktop application designed to provide greater control over iPhone data management. It enables you to flexibly transfer data between iOS devices and computers, so you can use it to sync your iPhone data to your MacBook without any hassle.
- Transfer contacts, text messages, notes, calendar events, photos, videos, and more from an iPhone to Mac.
- Import files from a computer to an iPhone or iPad with USB.
- Allow you to preview your iPhone data on your Mac before transferring it.
- Enable you to edit your contacts and add bookmarks to your iPhone on Mac.
- Back up various iOS data to a computer at once, and quickly restore the backup data to an iOS device.
- Compatible with iOS 5.0 or later, Mac OS X 10.10 or higher, and Windows 7 or upper.
Download this iOS data management software.


Step 1: Download and install Coolmuster iOS Assistant on your Mac. Then connect your iPhone via USB and tap "Trust" on the phone.
Step 2: The software will recognize your device quickly. Then you can choose a category from the left side.
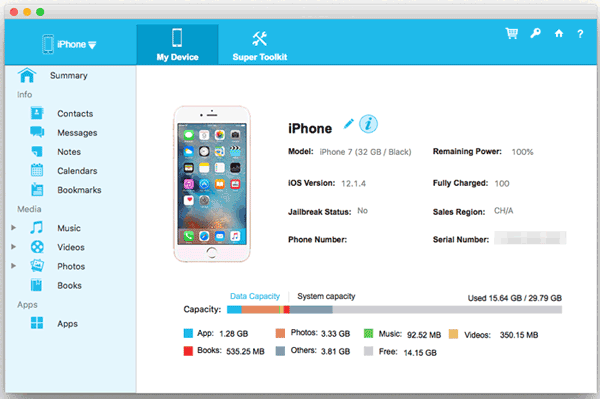
Step 3: Check the data you want to sync, and click "Export" to save it to your Mac. If you want to sync all the data at once, go to "Super Toolkit" to use the one-click backup feature.

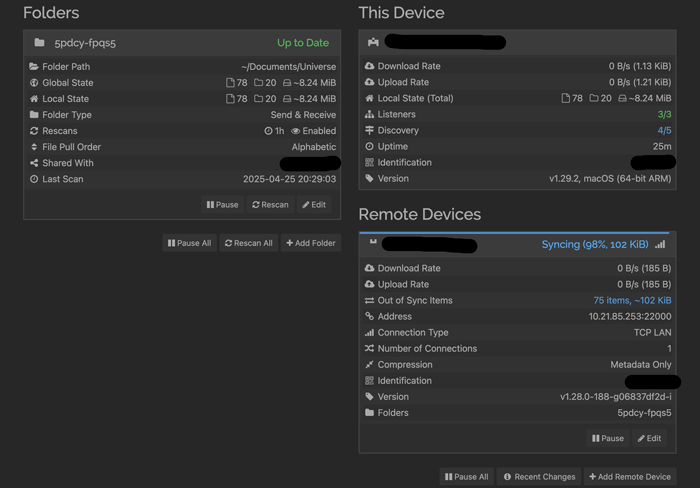
Syncthing is an open-source, peer-to-peer file synchronization tool that works across platforms. By installing Syncthing on both your iPhone (via a compatible iOS app) and your Mac, you can synchronize selected folders directly over a local network without using cloud storage.
Step 1: You will need to install Syncthing on your Mac and a compatible app (like MobiusSync) on your iPhone.
Step 2: Open the Syncthing Web UI on your Mac and the app on your iPhone. Exchange "Device IDs" to link them. Then create a folder on your Mac and share it with the iPhone device ID.
Step 3: On your iPhone, accept the incoming folder request. Files added to that folder on either device will now sync directly over your local network or the internet without ever touching Apple's servers.
Q1: Why isn't my iPhone showing up on my Mac?
If your iPhone is not appearing on your Mac, the cause is usually related to trust settings, connectivity, software, or permissions. Below is a troubleshooting checklist, ordered from the most common to the least common causes.
Q2: Are all apps synced via iCloud?
No. Only apps that support iCloud syncing will sync data across devices.
Q3: Can I sync music from my MacBook to my iPhone for free?
Yes. Finder allows music syncing without a subscription, provided you have the music files on your Mac.
Q4: What should I do if syncing fails repeatedly?
Choosing the right method depends on your needs. For music and backups, Finder is reliable. For effortless daily updates, iCloud is the gold standard. If you need specific file control or privacy, iPhone Data Manager and Syncthing offer powerful alternatives. iPhone Data Manager, in particular, allows you to easily transfer data and manage your iPhone data on your computer.
Related Articles
How to Transfer Photos from iPhone to iPhone without iCloud? (5 Proven Ways)
Transfer Contacts from iPad to iPhone with 5 Powerful Ways
Sell Your Broken iPhone Easily with Step-by-Step Guide (Latest)
How to Back Up Text Messages on iPhone Easily: 3 Reliable Solutions

Charlotte Smith, an accomplished editor in the dynamic landscape of mobile technology, has distinguished herself with her abundant experience and skills for iPhone, OnePlus, Sony, Vivo, Motorola, ZTE, Huawei, etc. Help readers and users solve the problems in iPhone Transfer and Mobile Data Management. Her proficiency extends beyond mere functionality, delving into the nuances of each brand with precision and clarity.
Copyright © samsung-messages-backup.com All Rights Reserved.


